Set up Link to heading
- Virtual machines:
| OpenVPN Server | Client | |
|---|---|---|
| OS | CentOS 6.9 | Windows 10 |
| Hostname | VPNServer | Wins10 |
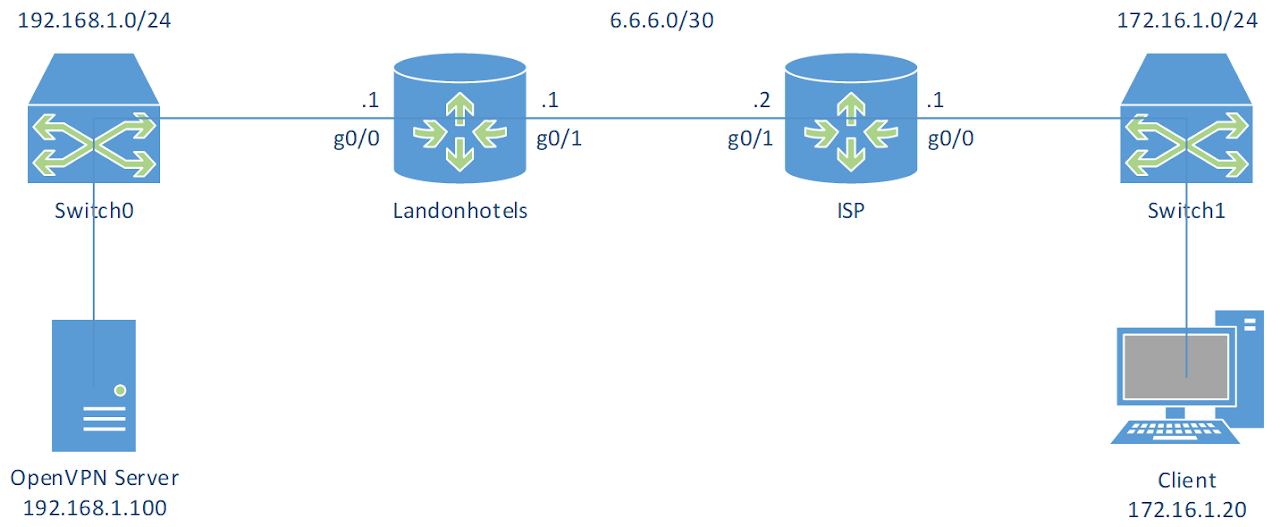
| IP address | 192.168.1.100/24 | 172.16.1.10/24 |
| IP address of DNS Server | 192.168.1.125 |
Turn off firewall on both machines.
A. In VPNServer Link to heading
1. Install OpenVPN Link to heading
# Install from EPEL
[root@VPNServer ~]$ yum --enablerepo=epel -y install openvpn easy-rsa bridge-utils
2. Create CA certificates Link to heading
[root@VPNServer ~]$ cd /usr/share/easy-rsa/2.0

[root@VPNServer 2.0]$ vi vars
# Line 64: change to your own environment
export KEY_COUNTRY="CA"
export KEY_PROVINCE="ON"
export KEY_CITY="Peterborough"
export KEY_ORG="FlemingCollege"
export KEY_EMAIL="admin@flemingcollege.ca"
export KEY_OU="IT"

[root@VPNServer 2.0]$ source ./vars
NOTE: If you run ./clean-all, I will be doing a rm -rf on /usr/share/easy-rsa/2.0/keys

[root@VPNServer 2.0]$ ./clean-all

[root@VPNServer 2.0]$ ./build-ca
Generating a 2048 bit RSA private key
.......+++
.................+++
writing new private key to 'ca.key'
-----
You are about to be asked to enter information that will be incorporated
into your certificate request.
What you are about to enter is what is called a Distinguished Name or a DN.
There are quite a few fields but you can leave some blank
For some fields there will be a default value,
If you enter '.', the field will be left blank.
-----
Country Name (2 letter code) [CA]: # Enter
State or Province Name (full name) [ON]: # Enter
Locality Name (eg, city) [Peterborough]: # Enter
Organization Name (eg, company) [FlemingCollege]: # Enter
Organizational Unit Name (eg, section) [IT]: # Enter
Common Name (eg, your name or your servers hostname) [FlemingCollege CA]: # Enter
Name [EasyRSA]: ServerCA
Email Address [admin@flemingcollege.ca]: # Enter
3. Create server certificates Link to heading
This will designate the certificate as a server-only certificate by setting the right attributes to avoid a possible Man-in-the-Middle attack.
[root@VPNServer 2.0]$ ./build-key-server server
Generating a 2048 bit RSA private key
...+++
........................+++
writing new private key to 'server.key'
-----
You are about to be asked to enter information that will be incorporated
into your certificate request.
What you are about to enter is what is called a Distinguished Name or a DN.
There are quite a few fields but you can leave some blank
For some fields there will be a default value,
If you enter '.', the field will be left blank.
-----
Country Name (2 letter code) [CA]: # Enter
State or Province Name (full name) [ON]: # Enter
Locality Name (eg, city) [Peterborough]: # Enter
Organization Name (eg, company) [FlemingCollege]: # Enter
Organizational Unit Name (eg, section) [IT]: # Enter
Common Name (eg, your name or your servers hostname) [server]: # Enter
Name [EasyRSA]: ServerCRT
Email Address [admin@flemingcollege.ca]: # Enter

Please enter the following 'extra' attributes
to be sent with your certificate request
A challenge password []: # Enter
An optional company name []: # Enter
Using configuration from /usr/share/easy-rsa/2.0/openssl-1.0.0.cnf
Check that the request matches the signature
Signature ok
The Subjects Distinguished Name is as follows
countryName           :PRINTABLE:'CA'
stateOrProvinceName   :PRINTABLE:'ON'
localityName          :PRINTABLE:'Peterborough'
organizationName      :PRINTABLE:'FlemingCollege'
organizationalUnitName:PRINTABLE:'IT'
commonName            :PRINTABLE:'server'
name                  :PRINTABLE:'ServerCRT'
emailAddress          :IA5STRING:'admin@flemingcollege.ca'
Certificate is to be certified until Nov  5 09:36:28 2027 GMT (3650 days)
Sign the certificate? [y/n]: y

1 out of 1 certificate requests certified, commit? [y/n] y
Write out database with 1 new entries
Data Base Updated
4. Generate Diffie Hellman (DH) parameter Link to heading
[root@VPNServer 2.0]$ ./build-dh
Generating DH parameters, 2048 bit long safe prime, generator 2
This is going to take a long time
......................+.....++*++*
5. Create client certificates Link to heading
[root@VPNServer 2.0]$ ./build-key client01
Generating a 2048 bit RSA private key
..................+++
..............+++
writing new private key to 'client01.key'
-----
You are about to be asked to enter information that will be incorporated
into your certificate request.
What you are about to enter is what is called a Distinguished Name or a DN.
There are quite a few fields but you can leave some blank
For some fields there will be a default value,
If you enter '.', the field will be left blank.
-----
Country Name (2 letter code) [CA]: # Enter
State or Province Name (full name) [ON]: # Enter
Locality Name (eg, city) [Peterborough]: # Enter
Organization Name (eg, company) [FlemingCollege]:
Organizational Unit Name (eg, section) [IT]: # Enter
Common Name (eg, your name or your servers hostname) [client01]: # Enter
Name [EasyRSA]: client01
Email Address [admin@flemingcollege.ca]: # Enter

Please enter the following 'extra' attributes
to be sent with your certificate request
A challenge password []: # Enter
An optional company name []: # Enter
Using configuration from /usr/share/easy-rsa/2.0/openssl-1.0.0.cnf
Check that the request matches the signature
Signature ok
The Subjects Distinguished Name is as follows
countryName           :PRINTABLE:'CA'
stateOrProvinceName   :PRINTABLE:'ON'
localityName          :PRINTABLE:'Peterborough'
organizationName      :PRINTABLE:'FlemingCollege'
organizationalUnitName:PRINTABLE:'IT'
commonName            :PRINTABLE:'client01'
name                  :PRINTABLE:'client01'
emailAddress          :IA5STRING:'admin@flemingcollege.ca'
Certificate is to be certified until Nov  5 09:37:33 2027 GMT (3650 days)
Sign the certificate? [y/n]: y

1 out of 1 certificate requests certified, commit? [y/n] y
Write out database with 1 new entries
Data Base Updated
6. Configure OpenVPN server Link to heading
# Copy keys directory to OpenVPN directory
[root@VPNServer 2.0]$ cp -pR /usr/share/easy-rsa/2.0/keys /etc/openvpn/keys

# Copy server config file to OpenVPN directory
[root@VPNServer 2.0]$ cp /usr/share/doc/openvpn-*/sample/sample-config-files/server.conf /etc/openvpn/

# Create ta.key to block DoS attacks and UDP port flooding
[root@VPNServer 2.0]$ cd /etc/openvpn/keys/

[root@VPNServer keys]$ openvpn --genkey --secret ta.key

# Edit config file
[root@VPNServer keys]$ vi /etc/openvpn/server.conf
# Line 32: listening port (change if need)
port 1194

# Line 35: protocol (if change to tcp, we need to comment out the line explicit-exit-notify 1)
;proto tcp
proto udp

# Line 52: change to tap which uses bridge mode
dev tap0
;dev tun

# Line 78: change path for certificates
ca /etc/openvpn/keys/ca.crt
cert /etc/openvpn/keys/server.crt
key /etc/openvpn/keys/server.key

# Line 85: change path for DH parameters
dh /etc/openvpn/keys/dh2048.pem

# Line 101: comment out
;server 10.8.0.0 255.255.255.0

# Line 120: uncomment and change [VPN server's IP] [SubnetMask] [the IP range for clients]
server-bridge 192.168.1.100 255.255.255.0 192.168.1.150 192.168.1.254

# Line 141: uncomment and change to internal network
push "route 192.168.1.0 255.255.255.0"

# Line 200: uncomment and change to IP address of DNS Server
push "dhcp-option DNS 192.168.1.125"

# Line 231: keepalive settings
keepalive 10 120

# Line 244: change path for ta.key
tls-auth /etc/openvpn/keys/ta.key 0

# Line 263: uncomment to enable compress
comp-lzo

# Line 281: enable persist options
persist-key
persist-tun

# line 296: uncomment and specify logs
log /var/log/openvpn.log
log-append /var/log/openvpn.log

# line 306: log level
verb 3
7. Set up Ethernet bridging with physical Ethernet NIC Link to heading
# Copy bridge-start script to OpenVPN directory
[root@VPNServer ~]$ cp /usr/share/doc/openvpn-*/sample/sample-scripts/bridge-start /etc/openvpn/bridge-start

# Copy bridge-start script to OpenVPN directory
[root@VPNServer ~]$ cp /usr/share/doc/openvpn-*/sample/sample-scripts/bridge-stop /etc/openvpn/bridge-stop

[root@VPNServer ~]$ chmod 755 /etc/openvpn/bridge-start /etc/openvpn/bridge-stop

# Edit bridge-start script
[root@VPNServer ~]$ vi /etc/openvpn/bridge-start
# Line 17-20: change
eth="eth0" # change if need
eth_ip="192.168.1.100" # IP address of physical Ethernet NIC
eth_netmask="255.255.255.0" # subnet mask
eth_broadcast="192.168.1.255" # broadcast address
8. Transfer files ca.crt, client01.crt, client01.key and ta.key which are under the /etc/openvpn/keys to Client
Link to heading
B. In Router Landonhotels Link to heading
# Port forwarding UDP 1194 to VPNServer
Landonhotels(config)# ip nat inside source static udp 192.168.1.100 1194 int g0/1 1194
C. In Wins10 Link to heading
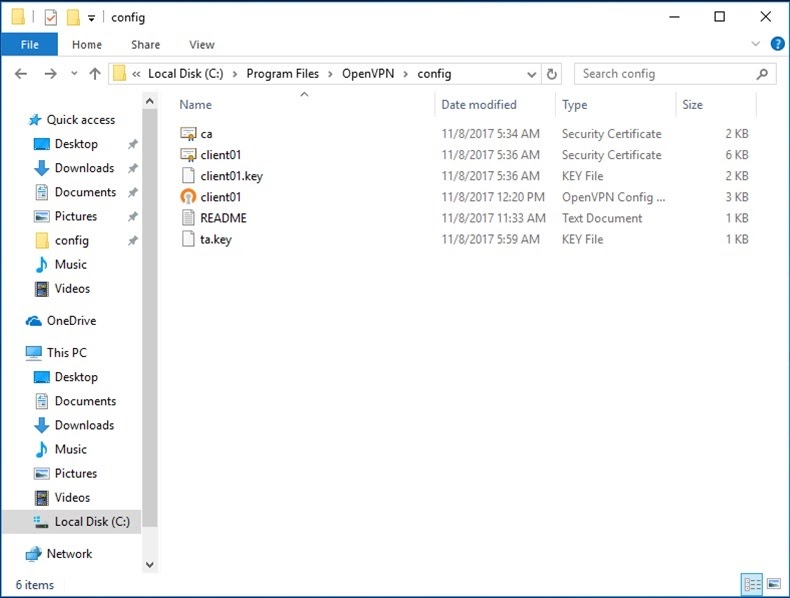
1. Copy client.ovpn file which is under C:\Program Files\OpenVPN\sample-config into C:\Program Files\OpenVPN\config and rename it to the name which we named when created client certificates
Link to heading
In this case, it is client01.ovpn.
2. Copy 4 files ca.crt, client01.crt, client01.key and ta.key from VPNServer into C:\Program Files\OpenVPN\config
Link to heading
3. Edit client01.ovpn
Link to heading
# Specify that we are a client
client

# On most systems, the VPN will not function
# unless you partially or fully disable the firewall for the TUN/TAP interface.
dev tap0
;dev tun

# On XP SP2 or higher, you may need to selectively disable
# the Windows firewall for the TAP adapter.
# Non-Windows systems usually don't need this.
;dev-node MyTap

# Are we connecting to a TCP or UDP server
;proto tcp
proto udp

# The hostname/IP and port of the server.
# You can have multiple remote entries to load balance between the servers.
remote 6.6.6.1 1194
;remote my-server-2 1194

# Choose a random host from the remote list for load-balancing.
# Otherwise try hosts in the order specified.
;remote-random

# Keep trying indefinitely to resolve the host name of the OpenVPN server.
# Very useful on machines which are not permanently connected to the internet
# such as laptops.
resolv-retry infinite

# Most clients don't need to bind to a specific local port number.
nobind

# Downgrade privileges after initialization (non-Windows only).
;user nobody
;group nobody

# Try to preserve some state across restarts.
persist-key
persist-tun

# If you are connecting through an HTTP proxy to reach the actual OpenVPN server,
# put the proxy server/IP and port number here.
;http-proxy-retry # retry on connection failures
;http-proxy [proxy server] [proxy port #]

# Wireless networks often produce a lot of duplicate packets.
# Set this flag to silence duplicate packet warnings.
;mute-replay-warnings

# It's best to use a separate .crt/.key file pair for each client.
# A single ca.crt file can be used for all clients.
ca ca.crt
cert client01.crt
key client01.key

# Verify server certificate by checking that
# the certificate has the correct key usage set.
# This is an important precaution to protect against Man-in-the-Middle attack.
# http://openvpn.net/howto.html#mitm
# To use this feature, you will need to generate
# your server certificates by running build-key-server script.
remote-cert-tls server

# If a tls-auth key is used on the server then every client must also have the key.
# The second parameter should be '0' on the server and '1' on the clients.
tls-auth ta.key 1

# Select a cryptographic cipher.
# This config item must be copied to the client config file as well.
# Note that v2.4 client/server will automatically negotiate
# AES-256-GCM in TLS mode.
cipher AES-256-CBC

# For compression compatible with older clients use comp-lzo.
# Don't enable this unless it is also enabled in the server config file.
comp-lzo

# Set log file verbosity.
verb 3

# Silence repeating messages
;mute 20
4. Run regedit, and go to: HKEY_LOCAL_MACHINE\SYSTEM\CurrentControlSet\Services\Tcpip\Parameters. Change value of IPEnableRouter to 1
Link to heading
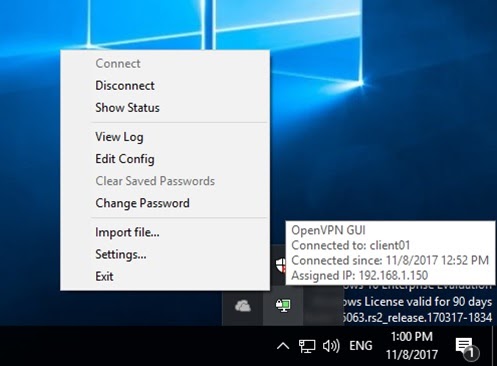
5. Open OpenVPN GUI and connect Link to heading
C:\Users\Administrator>ipconfig /all

Ethernet adapter Ethernet0:

   Connection-specific DNS Suffix  . :
   Description . . . . . . . . . . . : Intel(R) 82574L Gigabit Network Connection
   Physical Address. . . . . . . . . : 00-0C-29-15-B5-0B
   DHCP Enabled. . . . . . . . . . . : No
   Autoconfiguration Enabled . . . . : Yes
   IPv4 Address. . . . . . . . . . . : 172.16.1.10(Preferred)
   Subnet Mask . . . . . . . . . . . : 255.255.255.0
   Default Gateway . . . . . . . . . : 172.16.1.1
   NetBIOS over Tcpip. . . . . . . . : Enabled

Ethernet adapter Ethernet:

   Connection-specific DNS Suffix  . :
   Description . . . . . . . . . . . : TAP-Windows Adapter V9
   Physical Address. . . . . . . . . : 00-FF-53-70-FE-33
   DHCP Enabled. . . . . . . . . . . : Yes
   Autoconfiguration Enabled . . . . : Yes
   IPv4 Address. . . . . . . . . . . : 192.168.1.150(Preferred)
   Subnet Mask . . . . . . . . . . . : 255.255.255.0
   Lease Obtained. . . . . . . . . . : Wednesday, November 8, 2017 2:36:33 PM
   Lease Expires . . . . . . . . . . : Thursday, November 8, 2018 2:36:34 PM
   Default Gateway . . . . . . . . . :
   DHCP Server . . . . . . . . . . . : 192.168.1.0
   DNS Servers . . . . . . . . . . . : 192.168.1.125
   NetBIOS over Tcpip. . . . . . . . : Disabled

C:\Users\Administrator>ping 192.168.1.100 -n 1

Pinging 192.168.1.100 with 32 bytes of data:
Reply from 6.6.6.1: bytes=32 time=2ms TTL=62

Ping statistics for 192.168.1.100:
    Packets: Sent = 1, Received = 1, Lost = 0 (0% loss),
Approximate round trip times in milli-seconds:
    Minimum = 2ms, Maximum = 2ms, Average = 2ms